SpotiBOT
SpotiBOT by GlmbXecurity
ES
SpotiBOT es un bot para Spotify que facilita la gestión automática de playlists, agregando nuevas canciones de manera eficiente y organizada. Está diseñado para recolectar canciones nuevas de varias playlists y agregarlas a una playlist mensual creada específicamente para ello. Utiliza la API de Spotify para interactuar con las playlists y las canciones.
Novedades:
- Soporte para imágenes personalizadas: Ahora puedes añadir una imagen personalizada para tus playlists. La imagen debe tener un tamaño máximo de 500x500 px y un peso de 100 KB. Para utilizar una imagen personalizada, simplemente coloca la imagen con el nombre del género (por ejemplo,
rock.jpg) en la carpetaimagesy el bot la asignará automáticamente. - Creación de playlists por género: Se ha añadido la opción de crear playlists basadas en géneros musicales. Al ejecutar el bot, puedes indicar un género (por ejemplo,
rock) y el bot creará una nueva playlist con ese género y añadirá canciones correspondientes a ese estilo. - BOT Telegram. Bot de telegram para controlar el spotibot instalado en un servidor, de manera que puedas usarlo allá donde vayas.
-
Creado spotibot_core_last_7days.py actualiza directamente los ultimos 7 dias al lanzarlo. si se establece como tarea cron, siempre tendrás la musica a la última
EN
SpotiBOT is a Spotify bot that facilitates the automatic management of playlists, efficiently and systematically adding new songs. It is designed to collect new tracks from multiple playlists and add them to a monthly playlist specifically created for this purpose. It uses the Spotify API to interact with playlists and tracks.
New Features:
- Custom Image Support: You can now add a custom image for your playlists. The image must be a maximum of 500x500 px and 100 KB in size. To use a custom image, simply place an image with the genre name (e.g.,
rock.jpg) in theimagesfolder and the bot will automatically assign it to the playlist. - Genre-based Playlist Creation: A new feature has been added to create playlists based on musical genres. When running the bot, you can specify a genre (e.g.,
rock), and the bot will create a new playlist with that genre and add tracks related to that style. - Telegram Bot: A Telegram bot to control SpotiBOT installed on a server, allowing you to use it wherever you go.
| Español | English |
Tabla de Contenidos en Español
- Características
- Screenshots del programa
- Instalación
- Uso
- Configuración y Uso de TelegramSpotiBOT
- Resolución de problemas
- Automatización diaria con cron
Características
- Autenticación con Spotify: Se conecta a tu cuenta de Spotify de manera segura utilizando el flujo de autorización estándar.
- Cargar Playlists: Permite cargar las playlists desde un archivo
playlists.txtpara obtener las canciones de ellas. - Filtrado de Canciones Nuevas: Filtra las canciones nuevas y las canciones duplicadas.
- Playlist Mensual Automática: Crea y/o actualiza una playlist mensual con las canciones nuevas del mes, asignando un nombre basado en el mes y el año.
- Soporte para múltiples playlists: Puedes cargar varias playlists y agregar canciones a la playlist mensual.
- Historial de Canciones: Mantiene un historial de las canciones ya procesadas para evitar duplicados.
- Soporte para Imágenes Personalizadas: Ahora puedes agregar imágenes personalizadas a las playlists. Asegúrate de que la imagen sea de tamaño 500x500 px y 100 KB como máximo. Coloca las imágenes en la carpeta
imagesy el bot las utilizará automáticamente para la playlist correspondiente. - Creación de Playlists Basadas en Género: Ahora se pueden crear playlists específicas para cada género musical. El bot crea una nueva playlist basada en el género especificado y agrega canciones que coincidan con ese género.
Screenshots del programa
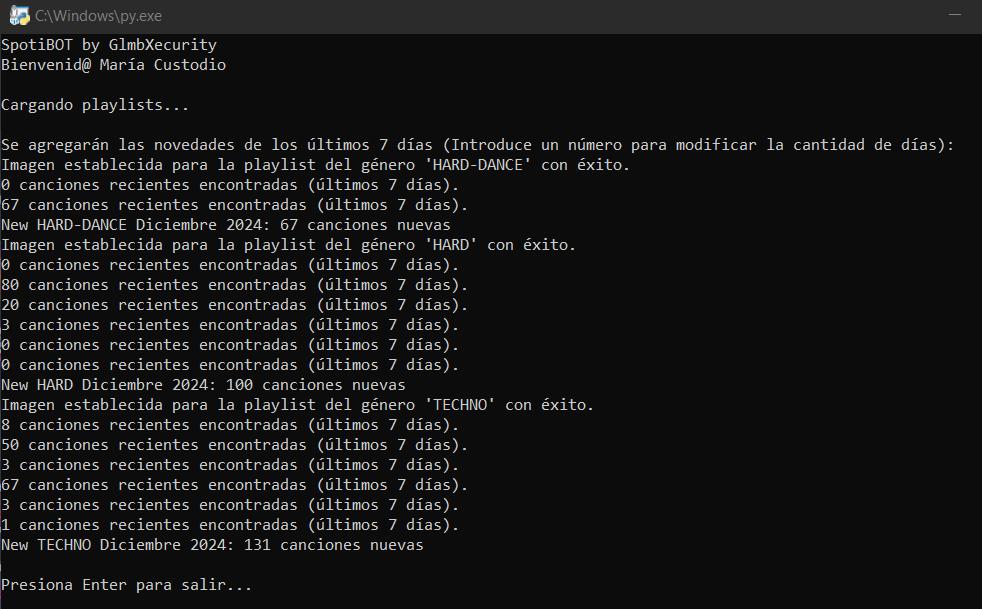
EJECUCIÓN DEL PROGRAMA
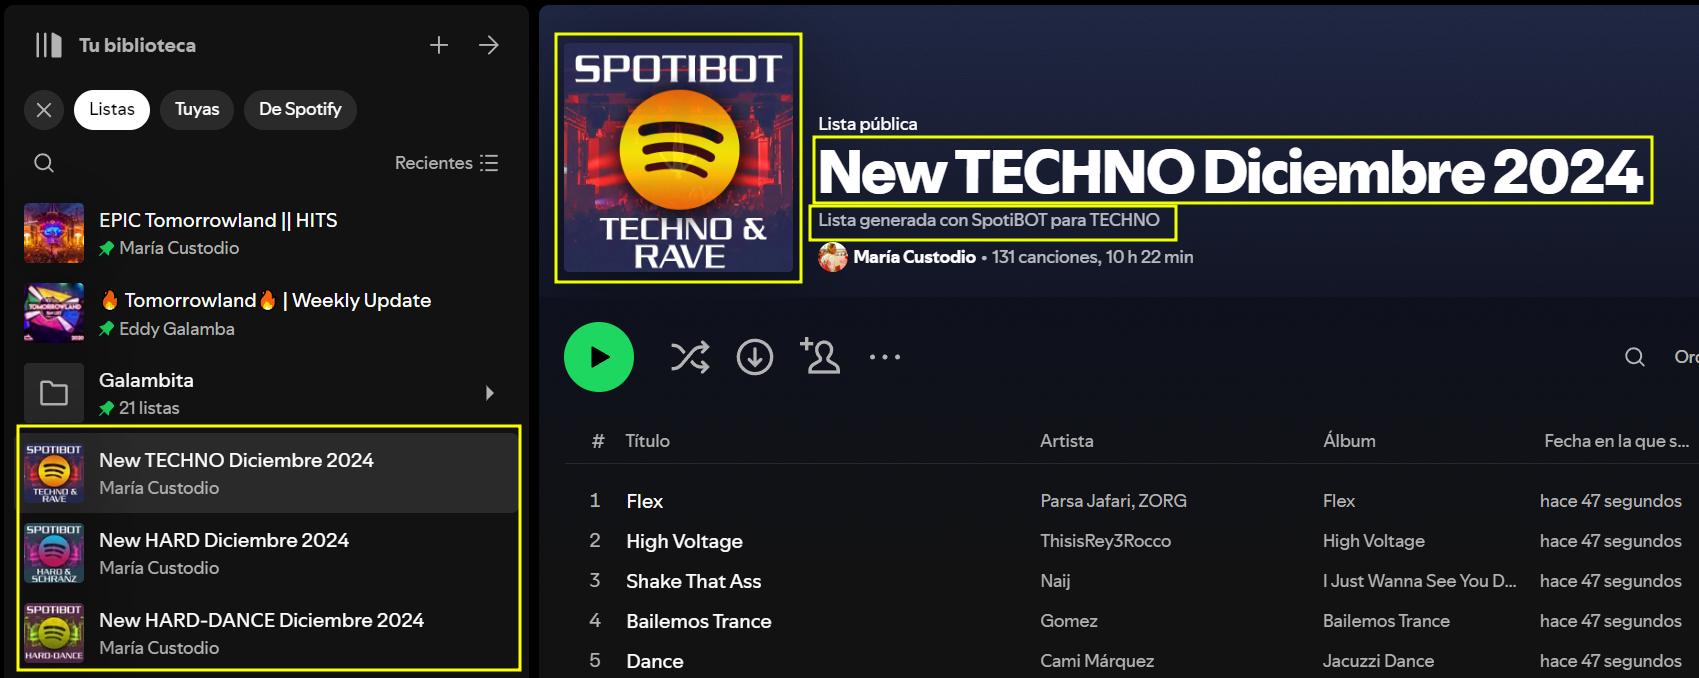
RESULTADO FINAL
Instalación
Para usar SpotiBOT, primero necesitas tener Python 3.x (Probado en Python 3.13.0)
Luego debes instalar spotipy y python-dotenv
pip install spotipy python-dotenv python-telegram-bot nest_asyncio
1. Clonar el repositorio
Clona el repositorio de GitHub en tu máquina local:
git clone https://github.com/glmbxecurity/SpotiBOT.git
2. Configuración
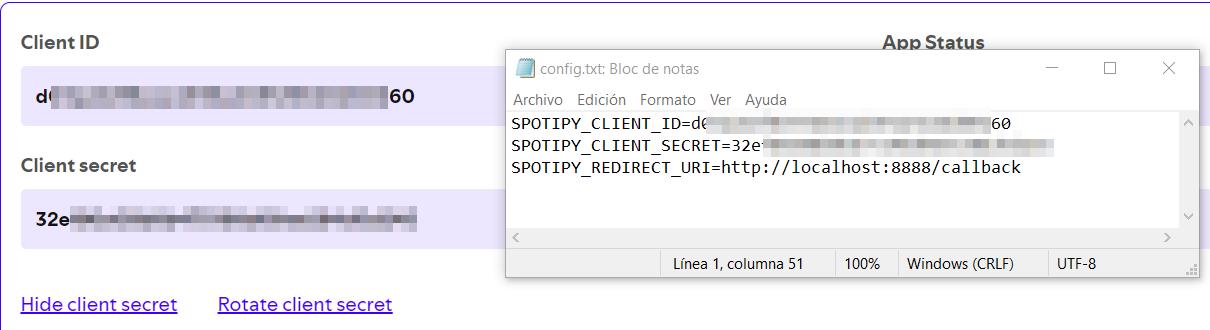
Antes de ejecutar el programa, necesitas configurar las credenciales de la API de Spotify. Para ello, crea un archivo config.txt en el directorio raíz del proyecto con la siguiente estructura:
SPOTIPY_CLIENT_ID=tu_client_id
SPOTIPY_CLIENT_SECRET=tu_client_secret
SPOTIPY_REDIRECT_URI=tu_redirect_uri
Estos valores los puedes obtener creando una aplicación en Spotify Developer Dashboard.
3. Crear el archivo playlists.txt
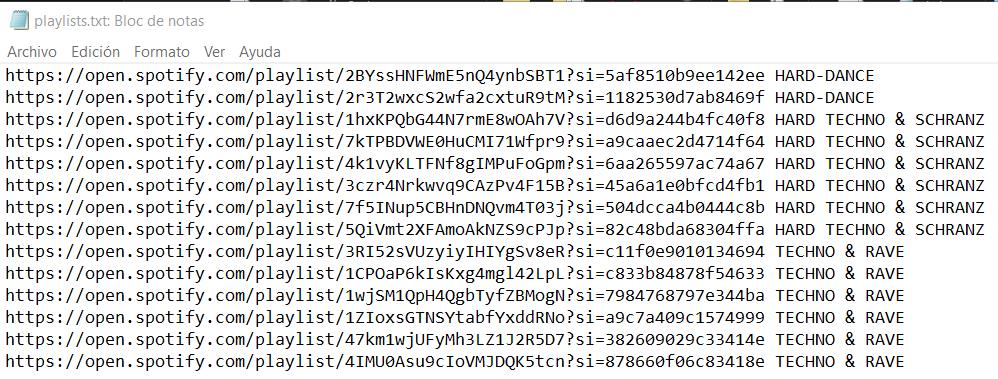
Crea un archivo playlists.txt en el directorio raíz del proyecto. Este archivo debe contener las URL de las playlists de las que deseas obtener las canciones, una por línea. Además, puedes asociar cada playlist con un género musical especificando el género al final de la URL, separado por un espacio.
Ejemplo del formato en playlists.txt:
https://open.spotify.com/playlist/playlist_id_1 rock
https://open.spotify.com/playlist/playlist_id_2 pop
https://open.spotify.com/playlist/playlist_id_3 jazz
En este ejemplo, la primera playlist se asociará con el género rock, la segunda con pop, y la tercera con jazz. El bot utilizará esta información para crear playlists basadas en géneros y asignar imágenes personalizadas (si están disponibles) para cada género.
4. Crear Imágenes Personalizadas para las Playlists (Opcional)
Si deseas usar una imagen personalizada para tu playlist, coloca las imágenes en la carpeta images dentro del directorio del proyecto. La imagen debe tener el nombre del género correspondiente, por ejemplo: rock.jpg o pop.jpg. La imagen debe ser de tamaño 500x500 px y un peso máximo de 100 KB.
5. Uso
Una vez que hayas configurado todo, puedes ejecutar el script para que SpotiBOT recoja las canciones nuevas de las playlists y las agregue a la playlist mensual. Además, si decides crear playlists basadas en géneros, el bot lo hará automáticamente.
Ejecuta el script desde la terminal:
python SpotiBOT.py
Resolucion de problemas
-
Hay ciertas playlists que, por algún motivo, no es capaz de leer, ya sea porque son privadas o porque necesiten de algún permiso especial. Hasta que se dé con la solución, esas playlists se deben de omitir para evitar fallos.
-
Para ejecutar la opción de “Los últimos 30 días”, previamente has de haber sincronizado al menos los últimos 7 o 15 días, sino Spotify detecta muchas requests de una vez y rechaza la petición.
-
Si eliminas canciones por error y no querías, o eliminas la playlist, la manera de corregir y volver a empezar es eliminando la carpeta
data(se genera al lanzar el programa), y eliminar el ficheroglobal_tracks.txt.## Configuración y Uso de TelegramSpotiBOT
1. CObtener el Token de Telegram
Para interactuar con la API de Telegram, primero debes obtener el Token de tu bot en Telegram:
- Abre Telegram y busca el BotFather.
- Envía el comando
/newboty sigue las instrucciones para crear tu bot. - Una vez creado, BotFather te dará un Token que deberás copiar.
2. Configurar el ID de Usuario
El bot TelegramSpotiBOT solo podrá ser ejecutado por un usuario específico. Para asegurarte de que solo tú puedes usarlo:
-
Obtén tu ID de Usuario de Telegram. Una manera fácil es enviarte un mensaje a ti mismo y luego usar un bot como UserInfoBot en Telegram para obtener tu ID.
-
Abre el archivo
TelegramSpotiBOT.pyy busca la línea en la que se configuraUSER_ID(o algo similar). Inserta tu ID de usuario ahí. Este será el único ID que el bot aceptará.
3. Configurar el Token de Telegram
Una vez que tengas el Token de Telegram:
- Abre el archivo
TelegramSpotiBOT.py. - Busca la línea donde se establece el token y reemplaza
your_telegram_bot_tokencon el token que te dio BotFather.
TOKEN = 'your_telegram_bot_token'
4. Lanzar el Bot
Para lanzar el bot (en segundo plano):
- Abre una terminal en el directorio donde se encuentra el archivo
TelegramSpotiBOT.py. - Ejecuta el siguiente comando:
nohup python3 TelegramSpotiBOT.py &
El bot se conectará a Telegram y comenzará a recibir comandos. Asegúrate de que tu ID de usuario esté configurado correctamente, de lo contrario, el bot no responderá a tus comandos.
5. Usar el Bot
Tendrás dependencias casi seguro, así que la primera vez que lo inicies tendrás que resolverlas.
6. Usar el Bot
Una vez que el bot esté en ejecución, puedes interactuar con él a través de Telegram. Los comandos disponibles y sus descripciones están listados en el código o en el archivo correspondiente.
7. Dependencias
bash
pip install python-telegram-bot nest_asyncio spotipy
Automatización diaria con cron
El script spotibot_core_last_7days.py actualiza tus playlists con las canciones nuevas añadidas en los últimos 7 días. Para no tener que ejecutarlo manualmente, puedes automatizarlo con cron para que se ejecute una vez al día.
Cómo configurar la tarea diaria en Alpine Linux:
- Instala
cronsi no lo tienes:
apk add dcron (esto para alpine linux)
- Editar crontab y añadir:
crontab -e 0 3 * * * cd /root/SpotiBOT && /usr/bin/python3 /root/SpotiBOT/spotibot_core_last_7days.py >> /root/SpotiBOT/cron.log 2>&1 EDITAR /root/SpotiBOT con la ruta donde tengas el bot - Iniciar cron y habilitar al inicio (Alpine linux) En debian no es necesario
rc-service dcron start
rc-update add dcron
Iniciar BOT con el S.O Alpine Linux
Suponiendo que el bot está en /root/SpotiBOT/TelegramSpotiBOT.py
- Crea un archivo en /etc/init.d/spotibot con este contenido: ```bash #!/sbin/openrc-run
name=”r” description=”Spotify Telegram Bot”
command=”/usr/bin/python3” command_args=”/root/SpotiBOT/TelegramSpotiBOT.py” pidfile=”/run/${RC_SVCNAME}.pid” command_background=true directory=”/root/SpotiBOT”
depend() { need net after firewall }
start_pre() { checkpath –directory –mode 0755 /run/${RC_SVCNAME} }
2. Iniciar con el equipo:
```bash
chmod +x /etc/init.d/spotibot
rc-update add spotibot default
rc-service spotibot start
rc-service spotibot status
Table of Contents in English
- Features
- Program Screenshots
- Installation
- Usage
- TelegramSpotiBOT Setup and Usage
- Troubleshooting
- Daily Automation with cron
Features
- Spotify Authentication: Connects to your Spotify account securely using the standard authorization flow.
- Load Playlists: Allows you to load playlists from a
playlists.txtfile to gather songs from them. - New Song Filtering: Filters out new songs and duplicates.
- Automatic Monthly Playlist: Creates and/or updates a monthly playlist with the new songs from the month, assigning a name based on the month and year.
- Support for Multiple Playlists: You can load multiple playlists and add songs to the monthly playlist.
- Song History: Keeps track of songs already processed to avoid duplicates.
- Custom Image Support: You can add custom images to playlists. Make sure the image is 500x500 px and 100 KB or less. Place the images in the
imagesfolder, and the bot will use them for the corresponding playlist. - Genre-based Playlist Creation: The bot now creates genre-specific playlists. You can specify a genre (e.g.,
rock), and the bot will create a new playlist for that genre and add tracks accordingly.
Program Screenshots
PROGRAM EXECUTION
FINAL RESULT
Installation
To use SpotiBOT, you first need to have Python 3.x (Tested on Python 3.13.0)
Then, install spotipy and python-dotenv
bash
Copiar código
pip install spotipy
pip install python-dotenv
1. Clone the repository
Clone the GitHub repository to your local machine:
git clone https://github.com/glmbxecurity/SpotiBOT.git
2. Configuration
Before running the program, you need to configure your Spotify API credentials. To do this, create a config.txt file in the root directory of the project with the following structure:
SPOTIPY_CLIENT_ID=your_client_id
SPOTIPY_CLIENT_SECRET=your_client_secret
SPOTIPY_REDIRECT_URI=your_redirect_uri
You can get these values by creating an app in Spotify Developer Dashboard.
3. Create the playlists.txt file
Create a playlists.txt file in the root directory of the project. This file should contain the URLs of the playlists you want to get songs from, one per line, and you can also associate a genre to each playlist by writing it after the URL.
Example format in playlists.txt:
https://open.spotify.com/playlist/playlist_id_1 rock
https://open.spotify.com/playlist/playlist_id_2 pop
https://open.spotify.com/playlist/playlist_id_3 jazz
In this example, the first playlist is associated with the rock genre, the second with pop, and the third with jazz. The bot will use this information to create genre-based playlists and assign custom images (if available).
4. Create Custom Playlist Images (Optional)
If you want to use a custom image for your playlist, place the images in the images folder inside the project directory. The image should be named according to the genre, for example: rock.jpg or pop.jpg. The image should be 500x500 px and 100 KB or less.
5. Usage
Once everything is configured, you can run the script for SpotiBOT to collect new songs from the playlists and add them to the monthly playlist. Additionally, if you choose to create genre-based playlists, the bot will handle that automatically.
Run the script from the terminal:
python SpotiBOT.py
Troubleshooting
-
Some playlists might not be accessible, either because they are private or require special permissions. Until a solution is found, those playlists should be omitted to avoid errors.
-
To use the “Last 30 Days” option, you must have already synced at least the last 7 or 15 days, otherwise Spotify detects too many requests at once and rejects the request.
- If you accidentally delete songs or playlists, you can reset everything by deleting the
datafolder (generated when you run the program), and removing theglobal_tracks.txtfile.
TelegramSpotiBOT Setup and Usage
1. Obtain the Telegram Token
To interact with the Telegram API, you first need to get the Token for your bot in Telegram:
1. Open Telegram and search for BotFather.

2. Send the command /newbot and follow the instructions to create your bot.

3. Once created, BotFather will give you a Token that you should copy.
2. Configure the User ID
The TelegramSpotiBOT bot can only be run by a specific user. To make sure only you can use it:
1. Get your Telegram User ID. An easy way is to send a message to yourself and then use a bot like UserInfoBot on Telegram to get your ID.

2.  Open the file TelegramSpotiBOT.py and find the line where USER_ID (or something similar) is set. Insert your user ID there. This will be the only ID that the bot will accept.
3. Configure the Telegram Token
Once you have the Telegram Token:
1. Open the file TelegramSpotiBOT.py.

2. Find the line where the token is set and replace your_telegram_bot_token with the token you got from BotFather.
TOKEN = ‘your_telegram_bot_token’
4. Launch the Bot
To launch the bot (in the background):
1. Open a terminal in the directory where TelegramSpotiBOT.py is located.

2. Run the following command: ```bash nohup python3 TelegramSpotiBOT.py & ``` The bot will connect to Telegram and start receiving commands. Make sure your user ID is correctly configured, otherwise the bot won’t respond to your commands. ### 5. Using the Bot
You will likely have dependencies, so the first time you run it you’ll need to resolve those.
6. Using the Bot
Once the bot is running, you can interact with it through Telegram. Available commands and their descriptions are listed in the code or the corresponding file.
7. Dependencies
Run this to install needed packages:
pip install python-telegram-bot nest_asyncio spotipy
Daily Automation with cron
The script spotibot_core_last_7days.py updates your playlists with new songs added in the last 7 days. To avoid running it manually, you can automate it with cron to run once a day.
How to set up the daily task on Alpine Linux:
- Install
cronif you don’t have it:
apk add dcron # for Alpine Linux
- Edit the crontab and add the following line:
crontab -e
0 3 * * * cd /root/SpotiBOT && /usr/bin/python3 /root/SpotiBOT/spotibot_core_last_7days.py >> /root/SpotiBOT/cron.log 2>&1
EDIT /root/SpotiBOT with yout custom SpotiBOT source
3 Start cron and enable it at boot (Alpine Linux). Not needed on Debian:
rc-service dcron start
rc-update add dcron